Saturday, August 4, 2012

Using Tortoise SVN

Ok, first thing first, forget about the terminologies used in VSS. Those terminologies are never used in SVN except for SVN Check out which is a bit different from the VSS CheckOut. We will explain this in detail later.

Installing an SVN Client:

Please install the tortoise SVN client from
http://download.cnet.com/TortoiseSVN-64-bit/3000-2383_4-75211577.html (64 bit)
http://download.cnet.com/TortoiseSVN-32-bit/3000-2383_4-10800080.html (32 bit)

OR directly from the Tortoise SVN Site.
http://tortoisesvn.net/downloads.html


Once the installation is complete, right click anywhere and you will have a right click option window like below.


You can see the options like “SVN Checkout” and “TortoiseSVN -->”. Hold your horses, we will explain these in detail later.
If you do not find these options in the right click, then the installer package is probably not supported by your OS. You need to either install an older version or a newer version based on the type of OS and Service Pack you have.


SVN Checkout, Downloading the Source Code for the first time:

Yes, we use SVN Checkout only once for downloading the source code for the first time.
 After we have downloaded the source code for the first time, we then use SVN Update and SVN Commit (Patience: will be explained later) for updating/committing your local code from/to the code repository.

How the SVN Checkout works? Well we need a project directory, lets say, Project_SVN on Desktop. We will navigate to Project_SVN directory. Inside that we will right click and then we will click on the SVN Checkout and a window like the following will appear.


Enter the repository url given to you by SVN adminstrator in the URL of repository as shown above. Click OK and it will ask for the authentication as below


Enter your username and password. If you want, you can “Save authentication” so that you may not enter the authentication each time you access the repository.
Once the authentication process is complete, it will start downloading the code. When the download finishes, it will enable the OK button at the bottom.


After the checkout finishes, you will see a folder structure like below


The green signs on folders and files mean that your local code has no changes since the last update.

Now, right click in the Project_SVN folder and you will see additional SVN commands as below.


SVN Update:

When someone else does some changes in a file and commits it to the code repository, you will never know of it. That’s a pitfall to SVN (really? I don’t think so). SVN works in an offline mode and that’s why it perfectly suits faster development. So if I don’t know which file is worked by whom, and I really don’t care in an offline mode as SVN works in an offline mode, then how will I know that I need to get the latest code. Well for that we will follow the following 2 golden rules.
1.    You SHOULD always update your code at the beginning of the day.
2.    You MUST always update your code before committing your changes because it is possible that the file you have worked on may have been changed by someone else in your team at the repository. So when you update, his/her code will be merged to your changed file. And after that you will commit your changes, fair enough, isn’t it?

So how do we do an SVN Update? Just right click in a folder you want to update and click the SVN Update. It will ask for authentication if you haven’t saved it already.

SVN Commit:

Remember; always do an SVN Update before an SVN Commit.

So how do we know that we need to commit? Simple, if you have red files in your LOCAL repository, you need to do an SVN Commit and if your functionality, you are working on, is complete.
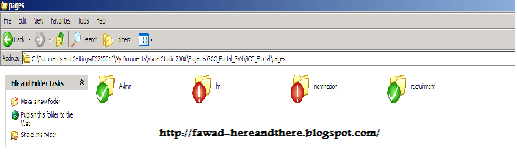
    

In this figure, we can see that some changes have been made to hr and nomination folder.

How do we do SVN Commit? There are 2 ways of doing it.

1.    We need to reach out for each red file in the hierarchy and right click on it and then click the svn commit.
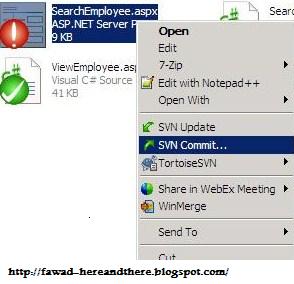
    

2.    Right Click at the root of the local directory and click on SVN Commit. A window will appear containinig a list of all locally changed files. You can select/deselect from that list of files and click OK at the bottom.
    

The above figure shows that 2 files have been changed at the local code repository. You can add a comment for the commit as well.

SVN DIFF:

What if we want to know what changes have we made locally. Local changes mean that the file will be in red. So navigate to that file. Right Click on it, hover on “TortoiseSVN -->” and click on Diff.


After clicking Diff, a window like below will open.


The left side shows code at the repository. The right side shows code on your local. The Orange and yellow line indicates that this line contain changes, in this case an extra space has been added.

SVN Show log:

This is used to check the log history as who committed what and when. This can be triggered through the following figure.


And the log history is shown like below.


One portion of the window shows the names of the people who committed the code. When we click on a name, we see which files he/she committed in the bottom section. If we click on a file in the bottom section, it will open an SVN Diff window showing a comparison between the code committed in that version and a previous version. We can also see revision Numbers in the log history. These versions will be used in SVN Update to revision.

SVN Update to revision:

If we want to revert a file to a previous version in time, we can do that by SVN Update to revision. We can do it as shown in the following figure.


Clicking it will appear another window as shown
      

Type in the revision number and click Ok.

Adding Files To Repository:

If we want to place new files to the SVN repository, we can do it by SVN Add. If we add a non-versioned file to the SVN local folder, it will look like below.
     

The question mark shows that this file is not versioned yet. Right click on the image and follow the figure below.


Click on the Add… option and the file will be versioned. Now you need to right click on the image and commit it.

Resolving Conflicts:

By now, you know that while working with SVN, UNLIKE VSS, you do not know if a file you are working on has been changed by someone else on the repository. SVN takes the burden of merging such changes. But SVN fails at one point when the changes being made are at the same line, by same line I mean same line number. In this case when you do an update, svn shows that some files are in conflict. SVN generates 4 copies of the same file in this case. Lets assume that the other guy’s name is Mr. X who made changes to the same file on the same lines I worked on
1.    Merged File. Contains changes from both me and Mr. X.
2.    My file. Contains my changes. It does not have changes from Mr. X.
3.    Current Version file. This is the file which Mr. X committed to repository. It does not contain my changes
4.    Previous Version. It neither contains changes from me nor from Mr. X.

If we ever came across any conflicts, we will use these files to resolve the issue.


Thats all from me.Hope this article will help someone out there.

Thursday, May 3, 2012

Difference between JDK and JRE

JDK:
         JDk means Java Development Kit. Its a bundle of soft-wares and tools that we use to develop java based softwares. JDK is needed by Java developers to develop programs and applications. the tools provided by JDK include compiler (javac.exe), Java application launcher (java.exe), Appletviewer, Debugger etc… Compiler converts java code into byte code. Java application launcher opens a JRE, loads the class, and invokes its main method.

JRE:
        JRE means Java Run-time Edition or Java Run-time Environment. JRE is required to run any Java based software or applications. JRE = JVM + Java Packages Classes(like util, math, lang, awt,swing etc)+runtime libraries.


The following snippet has been taken from the README.html in jdk1.6.0_03.

Contents of the JDKTM

This section contains a general summary of the files and directories in the JDKTM. For details on the files and directories, see the JDK File Structure section of the Java SE documentation for your platform.
Development Tools
(In the bin/ subdirectory) Tools and utilities that will help you develop, execute, debug, and document programs written in the JavaTM programming language. For further information, see the tool documentation.
Runtime Environment
(In the jre/ subdirectory) An implementation of the Java Runtime Environment (JRETM) for use by the JDK. The JRE includes a JavaTM Virtual Machine (JVMTM), class libraries, and other files that support the execution of programs written in the JavaTM programming language.
Additional Libraries
(In the lib/ subdirectory) Additional class libraries and support files required by the development tools.
Demo Applets and Applications
(In the demo/ subdirectory) Examples, with source code, of programming for the JavaTMTM Foundation Classes, and the JavaTM Platform Debugger Architecture. platform. These include examples that use Swing and other Java
Sample Code
(In the sample subdirectory) Samples, with source code, of programming for certain Java API's.
C header Files
(In the include/ subdirectory) Header files that support native-code programming using the Java Native Interface, the JVMTM Tool Interface, and other functionality of the JavaTM platform.
Source Code
(In src.zip) JavaTM programming language source files for all classes that make up the Java core API (that is, sources files for the java.*, javax.* and some org.* packages, but not for com.sun.* packages). This source code is provided for informational purposes only, to help developers learn and use the JavaTM programming language. These files do not include platform-specific implementation code and cannot be used to rebuild the class libraries. To extract these file, use any common zip utility. Or, you may use the Jar utility in the JDK's bin/ directory:
jar xvf src.zip

The Java Runtime Environment (JRETM)

The JavaTM Runtime Environment (JRETM) is available as a separately downloadable product. See the download web site.
The JRE allows you to run applications written in the JavaTM programming language. Like the JDKTM, it contains the JavaTM Virtual Machine (JVMTM), classes comprising the JavaTM platform API, and supporting files. Unlike the JDK, it does not contain development tools such as compilers and debuggers.
You can freely redistribute the JRE with your application, according to the terms of the JRE license. Once you have developed your application using the JDK, you can ship it with the JRE so your end-users will have a JavaTM platform on which to run your software.

The following video may also help.


Wednesday, January 18, 2012

The specified JRE installation does not exist

This error occurs when the jre specified in the ant run time configuration does not exist on the system. When we try to run the ant build file, it throws the following error.


Opening the details of the error shows that the ant build failed due to a coonflicted version of the jre.


In order to remove this error, you need to right click on the ant file. In the Run As you need to click on Open External Tools Dialog as shown in figure.


In the dialog box, under the Ant Build, select the ant build file you need to set the JRE for. Open the tab named JRE, probably at the extreme right of the dialog box. And select the JRE which you are using for development.


How to change server location in Eclipse


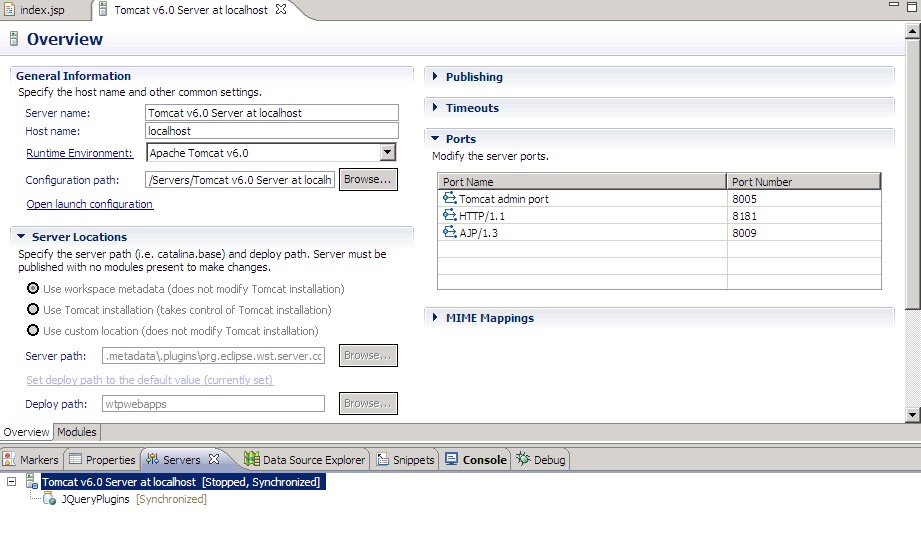
The radio buttons for changing location in server configuration file seem disabled. I loved myEclipse over Eclipse only due to this problem in Eclipse. The problem arises when we add or publish a project to a server in Eclipse. The screenshot of disabled location buttons is given as


There are three solutions to this problem.
  1. Server created but no projects published.
  2. Server Created and projects published into it.
    1. Change location in server properties
    2. Change location after removing projects.

  1. Server created but no projects published.
When a server is created and projects are added into it, DO NOT PUBLISH any projects into the server and you will be able to change the server location with the radio buttons.
  1. Server Created and projects published into it.
When a server is created and projects are added into it and we publish projects into the server, the location button in server configuration file go disabled. In these cases, in order to change the location, we must follow either of the following two methods
    1. Change location in server properties
Right click on the server, go to properties, go to general, you will see a change location button as seen in the screenshot.

 Press it and you will see a changed location left to it. You can either apply the changes directly from here or press the Cancel button and go to the server configuration file where you will see the enabled location radio buttons now.  
    1. Change location after removing projects.
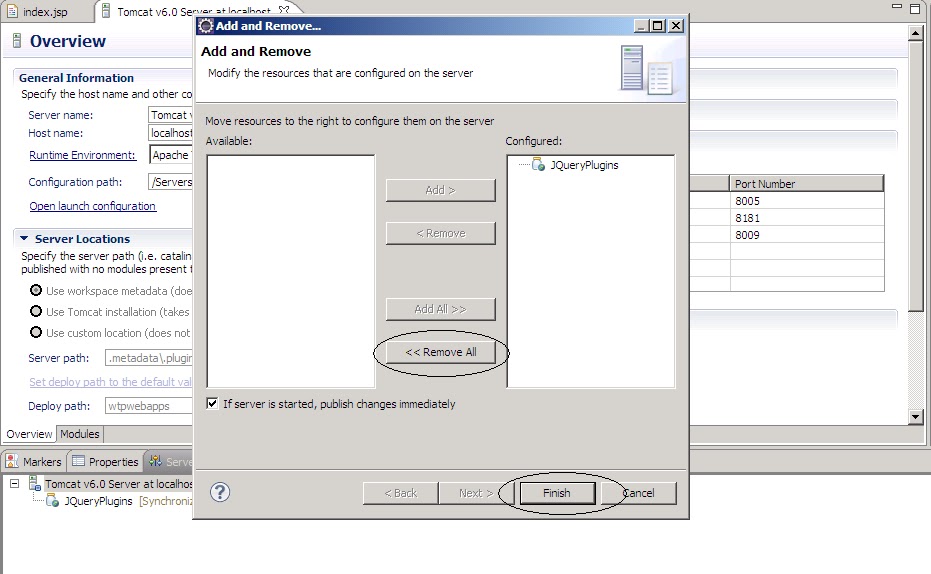
Right click on server, click on Add and Remove…, remove all the projects. Then right click on the server and click Clean….


Now you will be able to see the enabled location changing buttons in the server configuration file.


Thursday, December 22, 2011

How to implement a TreeMap


java.util.TreeMap is an implementation of the java.util.SortedMap interface. This class guarantees that the map will be in ascending key order, sorted according to the natural order for the key's class (see Comparable), or by the comparator provided at creation time, depending on which constructor is used.

Following is a simple example of inserting employees into a map based on their countries. The example consists of 2 classes.

Employee.java

package com.soft.model;

public class Employee{
private String name;
private String department;
private int age;
public String getName() {
            return name;
}
public void setName(String name) {
            this.name = name;
}
public String getDepartment() {
            return department;
}
public void setDepartment(String department) {
            this.department = department;
}
public int getAge() {
            return age;
}
public void setAge(int age) {
            this.age = age;
}

}

TreeMapExample.java

package com.soft.examples;

import java.util.Collections;
import java.util.Set;
import java.util.SortedMap;
import java.util.TreeMap;

import com.soft.model.Employee;

public class TreeMapExample {
            public static void main(String[] args) {
SortedMap<String, Employee> map = new TreeMap<String, Employee>();
SortedMap<String, Employee> descendingMap = new TreeMap<String, Employee>(Collections.reverseOrder());
Employee e = new Employee();
e.setName("Danial Fritz");
e.setDepartment("Field Based Development");
e.setAge(36);
map.put("Canada", e);
descendingMap.put("Canada", e);
e = new Employee();
e.setName("Denis Khoo");
e.setDepartment("Project Management");
e.setAge(30);
map.put("England", e);
descendingMap.put("England", e);
e = new Employee();
e.setName("Joe Kum");
e.setDepartment("Adminstration");
e.setAge(40);
map.put("Pakistan", e);
descendingMap.put("Pakistan", e);
e = new Employee();
e.setName("Anil Kumar");
e.setDepartment("Information Technology");
e.setAge(26);
map.put("China", e);
descendingMap.put("China", e);
e = new Employee();
e.setName("Anil Kumar");
e.setDepartment("Information Technology");
e.setAge(26);
map.put("Brazil", e);
descendingMap.put("Brazil", e);
e = new Employee();
e.setName("Anil Kumar");
e.setDepartment("Information Technology");
e.setAge(25);
map.put("Kowait", e);
descendingMap.put("Kowait", e);
e = new Employee();
e.setName("Anil Kumar");
e.setDepartment("Project Management");
e.setAge(26);
map.put("Jordan", e);
descendingMap.put("Jordan", e);
System.out.println("************ Sorting By Natural Order of keys ***********");
Set<String> keySet = map.keySet();
for (String key : keySet) {
            Employee employee = map.get(key);
System.out.println(key + "-----" + employee.getName() + "-----"+ employee.getDepartment() + "-----" + employee.getAge());
}
System.out.println("*** Descending Sort By Natural Order of keys ***");
keySet = descendingMap.keySet();
for (String key : keySet) {
Employee employee = map.get(key);
System.out.println(key + "-----" + employee.getName() + "-----"
+ employee.getDepartment() + "-----" + employee.getAge());
}
}
}


Output:
************ Sorting By Natural Order of keys ***********

Brazil-----Anil Kumar-----Information Technology-----26
Canada-----Danial Fritz-----Field Based Development-----36
China-----Anil Kumar-----Information Technology-----26
England-----Denis Khoo-----Project Management-----30
Jordan-----Anil Kumar-----Project Management-----26
Kowait-----Anil Kumar-----Information Technology-----25
Pakistan-----Joe Kum-----Adminstration-----40

*** Descending Sort By Natural Order of keys ***

Pakistan-----Joe Kum-----Adminstration-----40
Kowait-----Anil Kumar-----Information Technology-----25
Jordan-----Anil Kumar-----Project Management-----26
England-----Denis Khoo-----Project Management-----30
China-----Anil Kumar-----Information Technology-----26
Canada-----Danial Fritz-----Field Based Development-----36
Brazil-----Anil Kumar-----Information Technology-----26

Wednesday, December 21, 2011

How to implement ReverseOrderComparable

Java.Util.Comparable is an interface used for sorting collections. In previous example, we used a MultyField Comparable to sort a list in ascending order by multiple fields. In this example, we will implement a reverse order multy field Comparable in order to achieve a sorting in descending order or in other words in reverse order of whatever is implemented in the Comparable. This can be achieved just by a single line of code as
Comparator c= Collections.reverseOrder();// yes a comparator is used to achieve it.
This example is almost a replica of the previous example. It consists of the following 2 classes.

Employee.java:

package com.soft.model;

public class Employee{
private String name;
private String department;
private int age;
public String getName() {
            return name;
}
public void setName(String name) {
            this.name = name;
}
public String getDepartment() {
            return department;
}
public void setDepartment(String department) {
            this.department = department;
}
public int getAge() {
            return age;
}
public void setAge(int age) {
            this.age = age;
}
@Override
public int compareTo(Object obj) {
            Employee employee=(Employee)obj;
            if(this.getName().compareTo(employee.getName())==0){
                        if(this.getDepartment().compareTo(employee.getDepartment())==0){
                                    return this.getAge()-employee.getAge();
                        }else{
                                    return this.getDepartment().compareTo(employee.getDepartment());
                        }
            }else{
                        return this.getName().compareTo(employee.getName());
            }
}
}


MultyFieldComparableExample.java:

package com.soft.examples;

import java.util.ArrayList;
import java.util.Collections;
import java.util.List;

import com.soft.model.Employee;

public class MultyFieldComparableExample {
            public static void main(String[] args) {
                        List<Employee> list= new ArrayList<Employee>();
                        Employee e=new Employee();
                        e.setName("Danial Fritz");
                        e.setDepartment("Field Based Development");
                        e.setAge(36);
                        list.add(e);
                        e=new Employee();
                        e.setName("Denis Khoo");
                        e.setDepartment("Project Management");
                        e.setAge(30);
                        list.add(e);
                        e=new Employee();
                        e.setName("Joe Kum");
                        e.setDepartment("Adminstration");
                        e.setAge(40);
                        list.add(e);
                        e=new Employee();
                        e.setName("Anil Kumar");
                        e.setDepartment("Information Technology");
                        e.setAge(26);
                        list.add(e);
                        e=new Employee();
                        e.setName("Anil Kumar");
                        e.setDepartment("Information Technology");
                        e.setAge(26);
                        list.add(e);
                        e=new Employee();
                        e.setName("Anil Kumar");
                        e.setDepartment("Information Technology");
                        e.setAge(25);
                        list.add(e);
                        e=new Employee();
                        e.setName("Anil Kumar");
                        e.setDepartment("Project Management");
                        e.setAge(26);
                        list.add(e);
                        System.out.println("************ Before Sorting ***********");
                        for (int i=0;i< list.size();i++){
                                    System.out.println(list.get(i).getName()+"-----"+list.get(i).getDepartment()+"-----"+list.get(i).getAge());
                        }
                        System.out.println("**Name, Department, Age Sorting through Comparable **");
                        Collections.sort(list);
                        for (int i=0;i< list.size();i++){
                                    System.out.println(list.get(i).getName()+"-----"+list.get(i).getDepartment()+"-----"+list.get(i).getAge());
                        }

System.out.println("** Name, Department, Age Sorting through Comparable In Descending Order**");
Collections.sort(list,Collections.reverseOrder());
for (int i=0;i< list.size();i++){
System.out.println(list.get(i).getName()+"-----"+list.get(i).getDepartment()+"-----"+list.get(i).getAge());
}
                       
            }
}

Output:
************ Before Sorting ***********
Danial Fritz   ----- Field Based Development   ----- 36
Denis Khoo     ----- Project Management        ----- 30
Joe Kum        ----- Adminstration             ----- 40
Anil Kumar     ----- Information Technology    ----- 26
Anil Kumar     ----- Information Technology    ----- 25
Anil Kumar-----Project Management-----26

** Name, Department, Age Sorting through Comparable **

Anil Kumar     ----- Information Technology     ----- 25
Anil Kumar     ----- Information Technology     ----- 26
Anil Kumar     ----- Project Management         ----- 26
Danial Fritz   ----- Field Based Development    ----- 36
Denis Khoo     ----- Project Management         ----- 30
Joe Kum        ----- Adminstration              ----- 40

** Name, Department, Age Sorting through Comparable in Descending Order**

Joe Kum        ----- Adminstration                     ----- 40
Denis Khoo   ----- Project Management           ----- 30
Danial Fritz   ----- Field Based Development   ----- 36
Anil Kumar   ----- Project Management           ----- 26
Anil Kumar   ----- Information Technology     ----- 26
Anil Kumar   ----- Information Technology     ----- 25

An example of a simple MultyField Comparable can be found at
You may also find the following articles helpful.

How to implement ReverseOrderComparator


Java.Util.Comparator is an interface used for sorting collections. In previous example, we used a MultyField Comparator to sort a list in ascending order by multiple fields. In this example, we will implement a reverse order multy field Comparator in order to achieve a sorting in descending order or in other words in reverse order of whatever is implemented in the Comparator. This can be achieved just by a single line of code as
Comparator c= Collections.reverseOrder(new mployeeMultyFieldComparator());
 This example is almost a replica of the previous example. It consists of the following 3 classes.

Employee.java:

package com.soft.model;

public class Employee{
private String name;
private String department;
private int age;
public String getName() {
            return name;
}
public void setName(String name) {
            this.name = name;
}
public String getDepartment() {
            return department;
}
public void setDepartment(String department) {
            this.department = department;
}
public int getAge() {
            return age;
}
public void setAge(int age) {
            this.age = age;
}

}


EmployeeMultyFieldComparator.java:

package com.soft.model;

import java.util.Comparator;

public class EmployeeMultyFieldComparator implements Comparator{

            @Override
            public int compare(Object obj1, Object obj2) {
                        Employee e1=(Employee)obj1;
                        Employee e2=(Employee)obj2;
                        if(e1.getName().compareTo(e2.getName())==0){
                                    if(e1.getDepartment().compareTo(e2.getDepartment())==0){
                                                return e1.getAge()-e2.getAge();
                                    }else{
                                                return e1.getDepartment().compareTo(e2.getDepartment());
                                    }
                        }else{
                                    return e1.getName().compareTo(e2.getName());
                        }
            }

}


MultyFieldComparatorExample.java:

package com.soft.examples;

import java.util.ArrayList;
import java.util.Collections;
import java.util.List;

import com.soft.model.Employee;
import com.soft.model.EmployeeMultyFieldComparator;

public class MultyFieldComparatorExample {
            public static void main(String[] args) {
                        List<Employee> list= new ArrayList<Employee>();
                        Employee e=new Employee();
                        e.setName("Danial Fritz");
                        e.setDepartment("Field Based Development");
                        e.setAge(36);
                        list.add(e);
                        e=new Employee();
                        e.setName("Denis Khoo");
                        e.setDepartment("Project Management");
                        e.setAge(30);
                        list.add(e);
                        e=new Employee();
                        e.setName("Joe Kum");
                        e.setDepartment("Adminstration");
                        e.setAge(40);
                        list.add(e);
                        e=new Employee();
                        e.setName("Anil Kumar");
                        e.setDepartment("Information Technology");
                        e.setAge(26);
                        list.add(e);
                        e=new Employee();
                        e.setName("Anil Kumar");
                        e.setDepartment("Information Technology");
                        e.setAge(26);
                        list.add(e);
                        e=new Employee();
                        e.setName("Anil Kumar");
                        e.setDepartment("Information Technology");
                        e.setAge(25);
                        list.add(e);
                        e=new Employee();
                        e.setName("Anil Kumar");
                        e.setDepartment("Project Management");
                        e.setAge(26);
                        list.add(e);
                        System.out.println("************ Before Sorting ***********");
                        for (int i=0;i< list.size();i++){
                                    System.out.println(list.get(i).getName()+"-----"+list.get(i).getDepartment()+"-----"+list.get(i).getAge());
                        }
                        System.out.println("************ Name, Department, Age Sorting through Comparator ***********");
                        Collections.sort(list,new EmployeeMultyFieldComparator());
                        for (int i=0;i< list.size();i++){
                                    System.out.println(list.get(i).getName()+"-----"+list.get(i).getDepartment()+"-----"+list.get(i).getAge());
                        }

System.out.println("** Name, Department, Age Sorting through Comparator In Descending Order**");
Collections.sort(list,Collections.reverseOrder(new EmployeeMultyFieldComparator()));
for (int i=0;i< list.size();i++){
System.out.println(list.get(i).getName()+"-----"+list.get(i).getDepartment()+"-----"+list.get(i).getAge());
}
                       
            }
}

Output:
************ Before Sorting ***********
Danial Fritz   ----- Field Based Development   ----- 36
Denis Khoo     ----- Project Management        ----- 30
Joe Kum        ----- Adminstration             ----- 40
Anil Kumar     ----- Information Technology    ----- 26
Anil Kumar     ----- Information Technology    ----- 25
Anil Kumar-----Project Management-----26

****** Name, Department, Age Sorting through Comparator *******

Anil Kumar     ----- Information Technology     ----- 25
Anil Kumar     ----- Information Technology     ----- 26
Anil Kumar     ----- Project Management         ----- 26
Danial Fritz   ----- Field Based Development    ----- 36
Denis Khoo     ----- Project Management         ----- 30
Joe Kum        ----- Adminstration              ----- 40

** Name, Department, Age Sorting through Comparator in Descending Order**

Joe Kum        ----- Adminstration                     ----- 40
Denis Khoo   ----- Project Management           ----- 30
Danial Fritz   ----- Field Based Development   ----- 36
Anil Kumar   ----- Project Management           ----- 26
Anil Kumar   ----- Information Technology     ----- 26
Anil Kumar   ----- Information Technology     ----- 25

An example of a simple MultyFieldComparator can be found at
You may also find the following articles helpful.